Frequent maintenance of your bearings serves a dual purpose: it not only ensures your wheels glide effortlessly and swiftly on the track but also significantly prolongs the lifespan of your bearings. Inside this comprehensive guide, you’ll discover a video tutorial alongside detailed, easy-to-follow steps that encompass all the fundamental aspects of bearing maintenance.
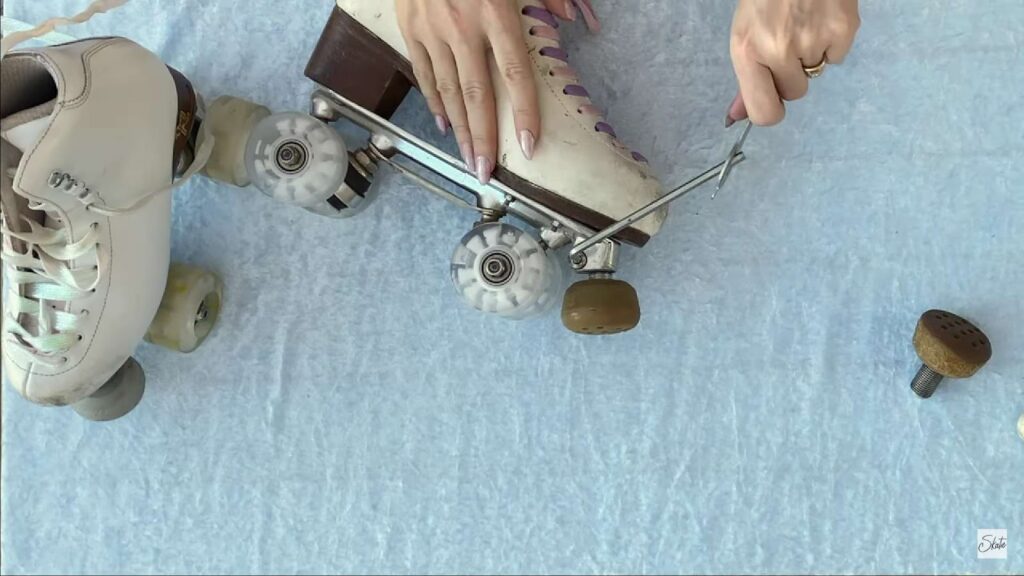
Step 1: Disassembling the Skate Wheels and Extracting Bearings
This initial step involves the careful removal of your skate’s wheels and the extraction of bearings. It’s a critical process that requires precision and the right tools.
Detailed Process:
- Wheel Removal: Start by detaching all eight wheels from your skates. This process might vary slightly depending on the skate model, so consult your skate’s manual if needed;
- Bearing Extraction: Each wheel contains two bearings, totaling sixteen for all wheels. Extract these bearings with care;
- Using the Right Tools: It’s essential to use a specialized bearing tool for this task. This tool is designed to apply force correctly to the metal races of the bearings, minimizing the risk of damaging the more delicate parts like the shields and cages.
Tips and Recommendations:
- Avoid Direct Force on Sensitive Parts: The shields and cages of the bearings are susceptible to damage. Ensure you’re applying force only to the metal races;
- Consider a Bearing Press: If you regularly maintain your skates, investing in a bearing press can be a worthwhile purchase. It streamlines the removal and reinstallation process;
- Stay Organized: Keep the bearings and wheels organized as you work. This helps in ensuring that all parts go back in the right place during reassembly.
Step 2: Preparing Bearings for Cleaning
This step focuses on preparing the bearings for a thorough cleaning by removing the shields and handling the C-clips for those with alloy shields.
Detailed Process:
- Shield Removal: Bearings come with either rubber or alloy shields. Rubber shields typically pop out easily, while alloy shields might be secured with C-clips;
- Handling C-Clips: If your bearings have C-clips, carefully use a safety pin or thumbtack to gently pry them away. This needs to be done cautiously to avoid bending or breaking the clips;
- Cleaning the Shields: Once removed, clean each shield with a soft cloth to remove any debris or dirt.
Tips and Recommendations:
- Safe Removal Techniques: Be gentle when removing the shields, especially if they are made of rubber, to avoid tearing them;
- Leave the Cages: Unless you’re doing a deep cleaning or maintenance, it’s advisable to leave the cages intact. They can be tricky to reinstall properly;
- Clean Workspace: Ensure you’re working in a clean, well-lit area. Small parts like C-clips are easy to lose.
- Insights;
- Regular Maintenance: Regular cleaning of bearings can significantly extend their life and improve skate performance;
- Understand Your Bearings: Familiarize yourself with the type of bearings your skates use. This knowledge is invaluable for effective maintenance and cleaning.
Step 3: Preparing for the Bearing Cleaning Procedure
Optimal Selection of Cleaning Solutions
The importance of making the right choice in cleaning agents cannot be overstated, as it plays a pivotal role in ensuring the absence of residual substances. Residues have the potential to entice dirt and obstruct the lubrication process, causing adverse effects on the bearing’s overall performance.
Highly Recommended Solutions:
- Premade Bearing Cleaners: These cleaners are specially formulated for bearings, guaranteeing thorough cleaning without the presence of any detrimental residues;
- Alternative Option – Rubbing Alcohol: A viable alternative to consider is rubbing alcohol, preferably with an alcohol by volume (ABV) content of 90% or higher. It proves highly effective in eliminating soap scum and any remnants of previous cleaning agents.
Additional Pointers:
- Always verify the compatibility of the chosen cleaning solution with the material of your bearing;
- Steer clear of cleaners that contain harsh chemicals, which could potentially harm the bearing surfaces.
Selection of the Appropriate Container
- Container Functionality: Although the type of container employed for the cleaning process is not of utmost importance, certain container features can significantly enhance the efficacy of the cleaning process. Containers from Bearing Cleaner Kits, for instance, are often designed to facilitate the vertical positioning of bearings. This orientation aids in the separation of debris and ensures a thorough cleaning experience;
- Filling the Container:To achieve the desired results, fill the container with an ample amount of cleaning solution, sufficient to completely immerse the bearings. This step guarantees that all components of the bearings receive the necessary cleaning attention.
Step 4: The Bearing Washing Procedure
Submerging and Agitating the Bearings
- Cleaning Process:
- Place the bearings into the container filled with your chosen cleaning solution;
- Secure the container’s lid to prevent any leakage;
- Vigorously shake or agitate the container for about 30 seconds. This action helps the solution penetrate every part of the bearings, ensuring a thorough clean.
- Settling Time:
- After agitation, let the bearings rest in the solution for 3-5 minutes. This allows time for the sediment and grime to settle at the bottom of the container.
Preparation for Post-Cleaning
- Setting Up a Cleaning Station:
- While the bearings are soaking, prepare a space for the next steps of drying and lubricating;
- Ensure the area is clean, well-ventilated, and free from dust or debris.
- Essentials for the Drying Area:
- Soft, lint-free cloths or towels for drying;
- Adequate ventilation or a fan to aid in air drying;
- All necessary lubrication tools and products should be within reach.
Step 5: Thoroughly Drying and Lubricating Bearings
It is of utmost importance to eliminate any trace of moisture from the bearings prior to the application of any lubricating substance. Below is an extensive guide for this task:
- Drying the Bearings: Following the cleaning process, it is imperative that the bearings are completely free from any residual water. In cases where a specialized bearing cleaner is employed, it is vital to meticulously adhere to the provided instructions. For those opting for a do-it-yourself approach, rubbing alcohol stands as an excellent choice due to its rapid evaporation and non-residue properties. Alternatively, you may utilize a blow dryer to expedite the drying process, but exercise caution by setting it to a cool temperature to avoid any potential damage;
- The Lubrication Procedure: Once you have ascertained that the bearings are entirely dry, proceed with great care to apply two drops of top-tier bearing lubricant to each bearing. This step plays a pivotal role in ensuring the bearings operate smoothly and enjoy an extended lifespan. Following this, gently rotate the bearings to ensure the even distribution of the lubricating agent.
Step 6: Assembling Bearings and Wheels Anew
In this ultimate phase, we embark on the meticulous task of reassembling the bearings and wheels with utmost precision:
- Replacing Bearing Shields: Exercise utmost care as you delicately affix the shields back onto each bearing, guaranteeing their perfect alignment and secure placement;
- Testing Bearing Spin: Once the shields find their place, take a moment to give each bearing a gentle spin to ascertain that they are properly seated and rotating freely;
- Installing Bearings into Wheels: Employ a specialized bearing tool to expertly reintroduce the bearings into the wheel assemblies. This instrument not only simplifies the process but also safeguards the bearings and wheels from potential damage;
- Attaching Wheels to Skates: To conclude, securely mount the wheels onto your skates, ensuring a snug and accurate fit to guarantee optimal performance.
By meticulously following these steps, the performance and lifespan of your skate’s bearings and wheels can be significantly enhanced, ensuring a smoother and safer skating experience. Read about the game-changing comfort and performance of the Warrior Dynasty Girdle in our in-depth review. Elevate your play today!
Conclusion
In this article, we will delve into the meticulous procedure of bearing maintenance, underscoring the paramount significance of adhering to safety measures and employing the appropriate instruments and materials. Spanning the spectrum from disassembly to cleansing methodologies and culminating in reassembly, the knowledge gleaned from this discussion can be universally applied, spanning the gamut of applications, encompassing everything from skateboard wheels to heavy-duty industrial machinery.
It is imperative to integrate routine maintenance and cleaning into your equipment care regimen. By faithfully adhering to the outlined directives, you can significantly protract the longevity of your bearings, translating into considerable time and cost savings over the long haul.
So, whether you find yourself amongst the ranks of DIY aficionados or count yourself among professional technicians, mastering the fine art of bearing cleaning stands as a highly esteemed skillset, one that will ensure the uninterrupted, efficient operation of your machinery for years to come.